Pages

Monday, June 11, 2018

Installing and Configuring Apache HTTP server on an EC2 Linux instance in AWS

Hello Friends,

In this post, I will elaborate:

How to Install & Configure Apache HTTP server on an EC2 Linux instance in AWS


Prerequisite:


1. An AWS Subsription
2. An EC2 Linux instance (I have taken RHEL for my comfort)
3. A client machine
4. An SFTP client to upload custom HTML files


Steps : 


Creating Security Groups for EC2 instance to allow HTTP & SSH (SFTP) traffic.


  • I am assuming that you have already created a EC2  Linux instance in your AWS subscription and it is in running status. I have chosen RHEL Linux as I am more comfortable with this flavor.
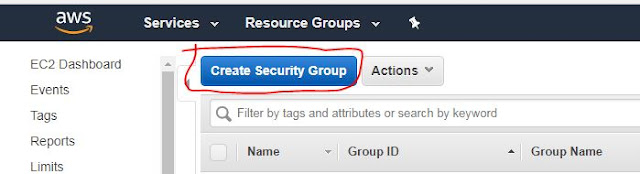
  • Go to your EC2 Dashboard and Select "Security Groups" under "Network & Security" Section.
  • Click on "Create Security Group" 

  • On the Next Screen , give security group a name, description and set "Inbound" rule to allow HTTP traffic from Anywhere and  OutBound rule for all ports, then click "Create"
  • This will allow HTTP traffic from public to EC2 instances associated with this security group.
  • You don't need to create a Security Group for SSH(SFTP) because at the time of creation of EC2 instance , you must have selected the default Security Group which allows SSH from all sources.
  • Now associate our EC2 instance with this new security group.
  • Go to EC2 Dashboard and select your EC2 instance, Click on Actions , select Networking and then select "Change Security Groups"

  • On the next screen Select the Security Group (HTTP & HTTPs) which you had created in last step (keep rest of the settings unchanged) and then click on "Assign Security Group"
  • Now your EC2 instance has been assigned with the necessary Security Groups required for allowing HTTP & SSH connection. 
  • Now we will connect to to our Linux instance.


Connecting an EC2 instance through Putty.

  • At the time of creation of your EC2 Linux instance, you must have created and downloaded the Key-Pair(.pem file).
  • This Key-Pair will be used to connect to that EC2 instance through Putty.
  • But before we could use that key-pair to connect the EC2 instance , we will have to convert it in the format which is understandable by Putty. 
  • Putty does not understand .pem format so we will convert it to .ppk (Putty Private Key) file using Puttygen tool
  • Puttygen.exe can be downloaded from This Link.
  • Now open the Puttygen.exe file on your local machine and click on File and then select "Load Private Key".

  • Browse to the location where you have saved the key-pair (.pem file) and click Open


  • It will load the Thumbprint of Private Key in PuttyGen Console.Now click on Save Private Key button.

  • Save the Private Key in PPK format now.

  • Since we now have converted the key-pair in Putty usable PPK format, we will use it in Putty as authentication to connect our Linux EC2 instance.
  • Now open Putty and in Session window enter following address in Host Name (Or IP Address field) 
       ec2-user@ec2-18-205-163-151.compute-1.amazonaws.com

  • Here ec2-user is the default user name for the Linux EC2 instance (for RHEL instances) and ec2-18-205-163-151.compute-1.amazonaws.com is the public DNS name of your EC2 instance. This can be found on the EC2 instance properties. 
  • Now on your Putty window , Click on the "+" sign before SSH and then click "Auth" for setting up Putty to use Private Key as authentication , click on browse and navigate to the location where you had saved the .PPK file created in PuttyGen.

  • Now Select the PPK (Private Key) file and click Open. It will load the key-pair file in to Putty.

  • Now click Open 

  • You will now see the Putty session has been established with your EC2 Linux instance with the default user (ec2-user). 
  • It will also show the IP of the host from where you have connected this EC2 instance from. (I have hidden my public IP for security purpose)


Installing Apache HTTP server on your EC2 Linux Instance 

  • Once you get the Putty session of your EC2 Linux instance, rest of the things are very straight forward.
  • Get in to Sudo (root) access by typing following command
           sudo su

  • Because these EC2 instance have internet access by default , we will directly install the Apache HTTP server from Yum repository 
  • Shoot following command on your Putty session:
         yum -y install httpd 
  • httpd is the package name of Apache HTTP server. The above command will install Apache on your EC2 instance.
  • Now permanently enable httpd service through following command 
         systemctl enable httpd


  • Once httpd service is enabled you need to start the httpd service through following command:
      systemctl start httpd

  • You have now taken all the steps to Install , Configure and enable Apache HTTP server on your EC2 Linux install. Now its time to connect

Testing:

  • To test that Apache HTTP server has been successfully installed on your EC2 Linux machine and is able to process HTTP request, try to browse the Public DNS name of your EC2 instance from your local machines browser.
  • If your browser shows the Apache Test pages (as following) then you have successfully configured the Apache HTTP server on your EC2 instance.


Happy Blogging !!!!!


Sunday, June 10, 2018

Installing and Configuring Apache HTTP server on Linux (RHEL)

Hello There,

In today's post I will show:


How to install and configure Apache HTTP server on Linux server


Prerequisite:

1. A linux server an version (I have taken RHEL for my confort)
2. Root (Sudo) access on the Linux machine to install Apache
3. Internet connection on Linux box to connect and download repositories (Apache)
4. A client machine to test the website and connectivity to Apache Web server.

Steps:


  • Log on to your Linux machine and get sudo access


  • Now install Apache HTTP server Linux using Yum command
  • Execute following command on your Linux terminal 
        yum -y install httpd
  • This command will search for binaries on the online yum repositories and will install the dependencies before installing Apahce HTTP service (httpd)


  • Once all dependencies and packages required for installing apache http server are installed, the screen will look like following : 

  • Once Apache HTTP server is installed on your Linux machine you need to enable the httpd service because by default all external services are disabled in Linux. Execute following command to enable httpd service
      systemctl enable httpd


  • Now start the httpd service by following command: 
     systemctl start httpd


  • Now you need to add a firewall rule in your Linux IPTables to allow HTTP traffic on Port 80. Otherwise clients will not be able to access the websites running on your Apache webserver.
  • Shoot following command to enable HTTP access on port 80 on your Linux machine.
       firewall-cmd --zone=public --add-port=80/tcp --permanent

  • Once you successfully add the firewall rule on your Linux machine, you will need to reload your firewall services to make this change in to effect:
  • Shoot following command to reload your your firewall service on Linux instance:
      firewall-cmd --reload

  • Now check if your Firewall has really allowed port 80 and if the Rule has been added to IPTables or not This command is just to double check that your firewall is allowing port 80 (http), if port 80 is allowed then you should get result as shown in following screenshot:
       iptables-save | grep 80


  • And that's it, You have taken all the necessary steps to Install & Configure Apache HTTP server on a Linux box.

Testing :

  • To test that Apache is now configured on Linux box and can serve the HTTP requests successfully, try to access your Linux server's IP from browser of client machine (In my case it is a windows XP Virtual Machine) like http://192.168.75.136
  • You should get the Apache Test page on client machine's browser.


Voila!!!!! Apache HTTP server is not successfully set up on your Linux machine

Happy Blogging !!!!


Wednesday, June 6, 2018

Publishing Static Website on AWS using S3 bucket with a custom domain name

Hi Friends,

I am starting a new series on my blog related to AWS.

As the first post under AWS series , I will show : 


How to publish a Static Website on AWS using S3 Bucket with custom domain name


Solution :


Prerequisites: We will need following prerequisites to host our static website on AWS using S3 Bucket with a custom domain name

1. A domain name (e.g. lalitgolani.tk) registered with a domain name registrar (like godaddy.com).
2. An AWS subscription (I am using the free tier subscription for this demo)
3. Static HTML files that you will upload to your website hosted on S3 bucket in AWS


Steps: 


Create a S3 bucket :

Create a S3 bucket with the same name as your domain name is: (in this example : lalitgolani.tk)

  • Log on to your AWS subscription 
  • Go to Services and select S3 under Storage section
  • click on Create Bucket button
  • At the next screen type the name of the bucket same as your custom domain name (in this example : lalitgolani.tk)
  • Click Next and keep the settings intact in "Properties" section, click next
  • In the Permissions tab on the create bucket window, select "Grant Public Read Access to this bucket"
  • Click Next to reach to review window and click "Create Bucket".


  • Once the your S3 bucket is created. Now its time to enable "Static Website Hosting" property on it.
  • Go to the S3 area of your AWS subscription and select the S3 bucket you just created (lalitgolani.tk)
  • Then go to its properties and select "Static Website Hosting" property
  • Select the first radio button "Use this bucket to host a website" and in the next text box put the name of the default page of your static website you want to display on your website as homepage. (e.g. index.html)
  • Click "Save" and get out of the properties of your S3 Bucket.


Register your Custom Domain Name (host name) with Route53.


  • Route53 is an excellent DNS service provided by AWS to route your request to other DNS name and register DNS names of your choice.
  • Go to Services and then Select "Network & Content Delivery" section and select Route53 
  • On Route53 page , select "Hosted Zones" under "DNS Management" category


  • Now enter the name of your custom domain registered with domain registrar in the "Create Hosted Zone" . This should be exactly same as your website name that you want to publish.
  • Select "Public Hosted Zone" in Type property.
  • Lastly click on "Create" button

  • As soon as you click on Create you will see a "Hosted Zone" with name (lalitgolani.tk in our case) has been created.

  • Select that hosted zone that you just created, you will notice that 2 Record Sets have already been created (One NS record and one SOA)
  • Copy the NS (Name Server) record set details in the Notepad as these will be used to update the Name Server records for your website name on the domain registrar's website where you have registered your custom domain from.

  • Now create a new Record Set (Similar to Host A Record) on the Route53 console which will point to your S3 bucket (which we had created in previous step)


  • On the Create Record Set window keep the Name field untouched as we have already mentioned our domain name (lalitgolani.tk)
  • Make sure the Type field is selected as A-IPv4 Address
  • Click on Alias and select Yes
  • In the next field "Select the S3 Bucket" you had created in previous step. 
  • This will make the Hosted Zone as an Alias of S3 bucket (Host A record in DNS language)
  • Click on Create.
  • You will see a new Record Set create pointing to S3 Bucket. 


Now 70% of your task has been done.

Updating Name Server Details for your Domain name on Domain Registrars website. 


This is an important step when you are hosting your website on S3 bucket with a custom domain name of your choice. (like lalitgolani.tk)

  • Go to your Domain Registrars Website where you bought your custom domain from (for example Godaddy.com)
  • Login to your account.
  • Go to the properties of your domain (in our case lalitgolani.tk)
  • Select Name Server details and update these name server details as per record sets we had copied in Notepad.
  • Note that changing the Name Server details on your custom domain name registrar's website may take 24 hours to 48 hours to reflect for all. This depends on the frequency of publishing Name Server details set by your Domain Registrar. 


Upload the Website files (html files) on your S3 Bucket to be published


Now as the last step you will upload your web files (html) that you want to publish using S3 bucket and Route53 hosting facility of AWS.

  • Go to your S3 bucket you had created in previous step and select that (here lalitgolani.tk)
  • Click on Upload button then select add files
  • Navigate to the location on your local computer where your html files have been kept , select them and click Open.
  • Now click next and in the "Set Permission" section select "Grant Public Read Access to this object(s) under Manage Public Permissions.  (Setting public Read access permission is necessary to enable these files to be accessible to public on your website hosted on S3 Bucket")
  •  and then click on upload.
  • These files will be uploaded to the S3 bucket root 


  • Once you upload your html files to your S3 buckets they are visible under your bucket as following : 


And thats it, you have completed all the steps to host your custom domain website on AWS S3 bucket through Route53 feature.

Now its time to test.


Go to your web browser and type the name of your website you have configured on AWS S3 bucket in previous steps (here lalitgolani.tk)

And here you go................


Enjoy!!! Feel free to comment on this blog post.