Pages

Wednesday, November 29, 2017

Manage your Own Pageviews doesn't work in Blogger with Custom Domains

If you are in to Blogging and writing blogs using Blogger or Blogspot, on any topic of your choice. I am sure that you will be concerned about your page views and its reach to your audience. In this tryst you keep watching the stats of your blog posts to see who is watching your blog posts and from where.

Tracking of pageviews of your blogposts give you an absolute idea that how can you make your blog more interactive and increase its reach to more audience.

Tracking of your blogpost views is quite simple in Blogger. 

You just need to log on to Blogger --> select the blog (From drop down menu at the Top Left corner) --> click to Stats

It will give you the detailed view of all pageviews (location and date wise) in tabular as well as graphical format.

But these stats also include your own pageviews that you might have clicked to see the look and feel of your blog posts. 

Being an honest blogger you will never want to show your own pageviews in overall statistics of your blog posts. Specially when you show your overall pageviews on your blog.

How to stop tracking your own page views in Blogger : 


Scenario 1: 


If you are using simple blog name like https://<yourblogname>.blogspot.com then it is quite easy to stop tracking your own page views.

Just follow these steps : 


  1. Log on to Blogger
  2. Select your blog from the drop down menu in the top left corner of the screen
  3. Click on Stats
  4. In the upcoming page , click on "Manage tracing your own page views" (See Pic 1)
  5. In the next page check the Check Box " Don't Track my pageviews for this blog (Pic 2).
Pic 1 : Manage Tracking your page views


Pic.2 : Manage Tracking your page views


And that's it. It will tell the Blogger to not to track the page views from your this browser.


Scenario 2 : 


When you are using a custom domain name (www.yourwebsite.com) where your blog is getting redirected to and you have not configured https (SSL) on that domain name like in my case (www.lalitgolani.com). 

When you click on ""Manage tracing your own page views" you run in to following error : 

"This site can't be reached. www.sitename.com unexpectedly closed the connection.
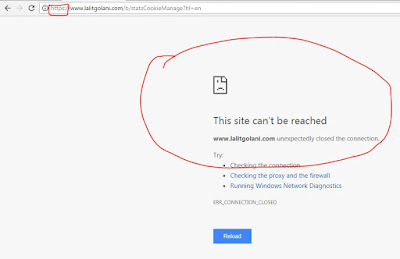
Error on Manage Tracking page

Reason : 

You face this issue because you are (1) Using the custom domain name for your website and (2). You have not enabled HTTPS on your custom domain name. Blogger enables SSL by default on your normal blog name which ends with "Blogspot.com" but if you are using custom domain name for your blog then you will need to buy an SSL certificate and configure it with your website name. And this incurs cost.

Solution : 

To solve this problem and enable yourself to "Manage Tracking your Own Pageviews" with the custom domain name of your Blog , just remove "HTTPS" from the address bar and hit enter.

This will lead you to the same page where you can manage your page view tracking settings.


Note: If you are using more than one browser on your machine and want to stop Blogger to track all your own page views, you will need to follow the above steps from all your browsers.


This solution worked for me like a charm. Hope it will work for you guys too !!!!!!!


Monday, November 27, 2017

Generating Self Signed SSL Certificate using OpenSSL on Windows machine


In my last post , we had learned How To Generate CSR using OpenSSL

Now when we have created CSR , we will use this CSR (Certificate Signing Request) to create a Self Signed Certificate.

So Lets get Ready for 

Generating Self Signed SSL Certificate using OpenSSL on Windows

For generating a Self Signed Certificate using OpenSSL on a windows machine we need following 3 things : 


  • OpenSSL installed on the machine.
  • A root CA (Certification Authority
  • A Private Key
  • A CSR file

We have already created a CSR in my last post but here we will create another CSR after we create the CA and Intermediate CA in OpenSSL

Creating Root CA in OpenSSL

For creating a Root CA in OpenSSL follow these steps from your OpenSSL console in Command Prompt.

1. Generate Root CA key through this command 

           genrsa -out lalitca.key 4096

         This command will generate a 4096 bit strong RSA key for our Root CA 
         and will store it in key file with name lalitca.key.


Note : If you want to password protect this key , simply add the -des3 option in the above command. For the sake of simplicity I have just skipped this option.

2. Now based on this CA Key we will create our Root CA certificate. We will have to give our Root CA an identity like Country, State, Location, Organization, OU, CommonName etc. Put in all this information carefully.

           req -new -x509 -days 3652 -key Lalitca.key -out Lalitca.crt


Note :  We using -x509 switch to create self-signed certificate and -days 3652 switch insures that this RootCA certificate will be valid for 10 years.


Now we have the Root CA in place. We are all set to create a CSR which will be used to create a self Signed certificate signed by this Root CA.

Creating a CSR 

Execute following 2 commands in same order to generate Private Key and CSR file.

                               genrsa -out test.key 4096

                         req -new -key test.key -out test.csr

Put in all required information again (Country, State, Location, Organization, Organization Unit, Common Name) Etc.

Note : Make sure you give a different Common Name (in this step) than Root CA. Otherwise you will run in to an error at later stage.


Now we have all 3 things in place (OpenSSL, RootCA and CSR). Its now time to generate our first Self-Signed certificate from OpenSSL.

Execute following command to create the certificate based on CSR and get it signed by RootCA we created in above steps.


x509 -req -days 1095 -in test.csr -CA lalitCA.crt -CAkey lalitca.key -set_serial 01 -out lalit.crt

This command will give you results like following : 

Signature ok
subject=C = US, ST = Arizona, L = Tempe, O = Lalit, CN = web.lalitgolani.com
Getting CA Private Key


And that's it.

You have successfully created your RootCA and first Self-Signed certificate using OpenSSL on a windows Machine.


In my next post , I will show how to convert the .CRT file in to .P12 (PFX) file and install it on IIS.
    

Friday, November 24, 2017

How To Generate Certificate Signing Request (CSR) or Private Key Using OpenSSL on Windows Machine

In my last post we had learned  How to Install OpenSSL on Windows Machine.

Now When we have successfully installed Open SSL on our windows machine , its time to use the OpenSSL for all stuff related to SSL.

In my following post , we will learn how generate Certificate Signing Request (CSR) file or Private Key which we send to Certification Authority to create SSL against. 


How to Generate CSR \ Private Key using OpenSSL


Step 1. To Generate a CSR using OpenSSL on Windows machine 
            open the Command Prompt as Administrator and navigate to 
            C:\OpenSSL-Win32\bin and type openssl.exe and hit enter.


Step 2.  Once the OpenSSL command line interface is visible, type following 
            command to create the Private key. This Private Key will be used to 
            create the CSR file.

            genrsa -out "C:\OpenSSLCertificates\private-key.key" 2048
            
            on successful execution of above command , you will get following 
            output in command window.

Note :  I have specified the path (C:\OpenSSLCertificates) to save all keys and files at centralized location and for the sake of convenience. 
            

Step 3.  Now execute the following command to generate CSR file out of Private 
            Key created in Step 2.


              req -new -key C:\OpenSSLCertificates\private-key.key -out         
              C:\OpenSSLCertificates\www_lalitgolani_com_csr.txt


As soon as you hit the enter button , you will be asked to fill in following details to complete the CSR creation request. Fill in all this information with utter attention to avoid any issues at later stage.

  • Country Name: Put in the first 2 letters of country where the site belongs to. Example : IN
  • State or Province: Spell the complete name of State , Example : Rajasthan
  • Locality or City: Enter your town name :  For example : Jaipur
  • Company: Enter the Company Name if you have any
  • Organizational Unit: Enter the department name which this website is for. You can leave this blank if you dont want to reveal the department name.
  • Common Name: This field is most important. Put in the full name of your website for which you want to create the SSL certificate. Make sure you put the correct name of the website because the SSL certificate will be created based on the this common name only. In your example I have put the Common name as : www.lalitgolani.com 

Note :  Please make sure to not to enter an email address, challenge password or an optional company name when generating the CSR.

 As soon as you complete the above details and hit enter a CSR file will be generated at path which you have mentioned in above command. In our case it will be created on path C:\OpenSSLCertificates with name www_lalitgolani_com_csr.txt


Step 4 :  Now the CSR file (.txt) for your SSL certificate is ready. Just pick the CSR file and send it to any certification authority like Digicert, Verisign etc to get SSL certificate generated against it.


In my Next post I will show how to create the self signed certificate using Open SSL.


Thursday, November 23, 2017

Install OpenSSL on Windows

Being a webserver administrator , you are many a times required to request SSL certificates, install them on websites, or need to convert them to other formats like .Crt, .Pfx, .p12 etc....

Though there are many tools available in the market \ internet which can convert your SSL certificate to other formats bus the best and handy tool , i suppose, is OpenSSL.

OpenSSL can be installed on your local machine (Windows or Unix) and you can play around with it , tweek things, and learn how does it operate.

In this blog post I will share : 

How to Install OpenSSL on Windows

Step 1:  Download the Windows version of OpenSSl from here. You wouldn't 
             find the binaries on Openssl.org site. I would suggest to download the 
             full version (around 30 MB) as it will give you more options to play 
             around. ( Latest OpenSSL version for Windows 32 
             bit is Win32 OpenSSL v1.1.0g

Step 2:  Save the exe file at any location of your system and double click it.

Note :  You may run in to following error if Microsoft Visual C++ Redistributable Package is not installed on your machine. It is prerequisite to have it installed before you go for OpenSSL installation. You can download it from Microsoft's Download store.


Step 3: Click next and keep the default path of installation as C:\OpenSSL-  Win32.


Step 4: Leave the default settings as it is for next screen and click Next 


Step 5:  Once all parameters are set, click Install


If all is fine on your machine it will install OpenSSl on your machine in less than 2 minutes. For my machine it took exactly 1 minute 32 seconds.

Once the OpenSSL is installed , just click finish. 

If you you want to donate few bucks to OpenSSL select any of the check box.


Step 6 :   I want to create the certificates in folder C:\OpenSSLCertificates. So 
               create a folder called OpenSSLCertificates in C drive of your machine.


Step 7 : Now start a command prompt as administrator and go to 
            C:\OpenSSLCertificates.

Step 8 : Once OpenSSL has been successfully installed on your 
            Windows machine and you have created a folder to store certificates , 
            you will obviously want to run it. But before running it you should set 
            following 2 Environment Variables. 

            Put the following 2 commands in your command window

               set RANDFILE=c:\OpenSSLCertificates\.rnd

               set OPENSSL_CONF=C:\OpenSSL-Win32\bin\openssl.cfg


Step 9 : Now you are all set to run OpenSSL.  To run it go to path C:\OpenSSL-
            Win32\bin and Right Click OpenSSL.exe and select Run As 
            Administrator


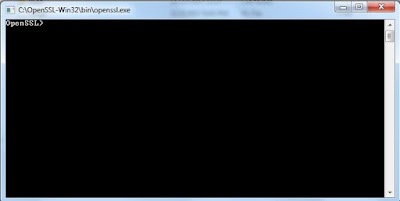
Step 10 :  If you have followed all above steps properly , you should see 
               following screen 


Your comments are welcome about this post!!!!!

Thursday, November 16, 2017

How to know the ..NET Framework version installed on your machine

Issue :  

Its a common practice among Webserver Administrators to find out the exact version of .net framework installed on their IIS box. It can be found in the properties of Application Pool in IIS manager. But you can find only the main version of .Net Framework there like 1.1, 2.0, 3.0, 3.5, 4.0 etc.


If you need to know the exact version of .NET Framework like (4.5, 4.6, 4.61, 4.7 etc) the above mentioned way can not help. 


Solution : The best and most authentic way to know the exact version of .NET Framework installed on your machine is : 

1. Log on to server with Admin rights.
2. Go to Run
3. Type : Regedit
4. It will open registry editor.
5. Go to following path under HKEY_Local_Machine : 

HKEY_LOCAL_MACHINE\SOFTWARE\Microsoft\NET FRAMEWORK Setup\NDP\V4\Full

6. Click on "Full" key and at the right hand pane you will find another key with name "version"
7. This key contains the exact version number of .NET Framework 4 installed on your machine.

See the following pic :  


CHEERS!!!

Monday, November 13, 2017

Sharepoint Error : Error deleting Web site . You can't delete a site that has subssites

Issue: Sometimes we face an error while deleting a Site under a site collection which has some sub sites created under it.

We get following error when we try to delete a site which has its child sub-sites already created :

Error deleting Web site . You can't delete a site that has subssites

STSADM -o deleteweb command also does not delete the site and throws the same error.

This error message itself is an incorrect statement because you can easily delete sharepoint sites that have subsites through following steps.


Solution:  Try Following steps to delete such site that are not top level site collections and have sub sites created under them:

  • Go to Site Admin Screen with Admin Privileges 
  • Select Site Actions
  • Go to Site Settings
  • From Site Administration >>> Content and Structure  (You need to have the "Office Sharepoint Server Publishing Infrastructure" site collection feature activated to see the Content and Structure link. )
  • In the left pane, move to the parent or the main site which you want to delete and select it by clicking it.
  • In the right pane, choose the site you want to delete. Click on all subsites' check boxes of that main site if you want to delete them as well.
  • Click on  Actions >>> Delete
  • You will be prompted with following message : 

                  Deleting the selected sites will permanently delete all content and 
                  user information. All subsites in this site will also be permanently 
                  lost. Do you want to continue?: 

  • Click OK

You will now be able to delete the site having subsites.


How to Connect database server running SQL Embedded Editiong SQL 2005 or SQL 2008

Connecting the Management Console of SQLExpress Edition of SQL Server through Management Studio:

When we install WSS 3.0 (Windows Sharepoint Services 3.0 on a Standalone machine, it installs the SQL Embedded Version of MS SQL Server to use as back end database server. When we try to connect this SQL server via Management Studio, 

It gives us following error.

============
ERROR MESSAGE
============
Cannot connect to SERVER\MICROSOFT##SSEE.
===================================
A network-related or instance-specific error occurred while establishing a connection to SQL Server. The server was not found or was not accessible. Verify that the instance name is correct and that SQL Server is configured to allow remote connections. (provider: SQL Network Interfaces, error: 26 - Error Locating Server/Instance Specified) (.Net SqlClient Data Provider)
------------------------------
------------------------------
Error Number: -1
Severity: 20
State: 0
------------------------------

Reason : 

Because this version of SQL server ( Embedded Edition) is installed by Sharepoint, the SQL server Management studio does not consider it as fully supported SQL server. That's why you can not connect the backend database server (SSEE) via Management Studio by simply typing the server name or its IP Address. 


Solution : 

To connect the Embedded version of SQL Server (installed by Sharepoint) via Management studio, you need to use named pipes address as following : 

1. Open the Management studio (With Farm Admin or SA login) on the machine where Sharepoint has installed the express version of SQL Server.

2. Put exactly following Named Pipes Address in the Server Name box : 

    np:\\.\pipe\MSSQL$MICROSOFT##SSEE\sql\query


3. Just click Connect and you will be able to see the Databases configured by Sharepoint on its local version of Express Edition.

4. You can carry out all required operations from here provided you have Admin access on all databases.

ENJOY !!!!!