Hi Friends,
I am starting a new series on my blog related to AWS.
As the first post under AWS series , I will show :
2. An AWS subscription (I am using the free tier subscription for this demo)
3. Static HTML files that you will upload to your website hosted on S3 bucket in AWS


I am starting a new series on my blog related to AWS.
As the first post under AWS series , I will show :
How to publish a Static Website on AWS using S3 Bucket with custom domain name
Solution :
Prerequisites: We will need following prerequisites to host our static website on AWS using S3 Bucket with a custom domain name
1. A domain name (e.g. lalitgolani.tk) registered with a domain name registrar (like godaddy.com).2. An AWS subscription (I am using the free tier subscription for this demo)
3. Static HTML files that you will upload to your website hosted on S3 bucket in AWS
Steps:
Create a S3 bucket :
Create a S3 bucket with the same name as your domain name is: (in this example : lalitgolani.tk)- Log on to your AWS subscription
- Go to Services and select S3 under Storage section
- click on Create Bucket button
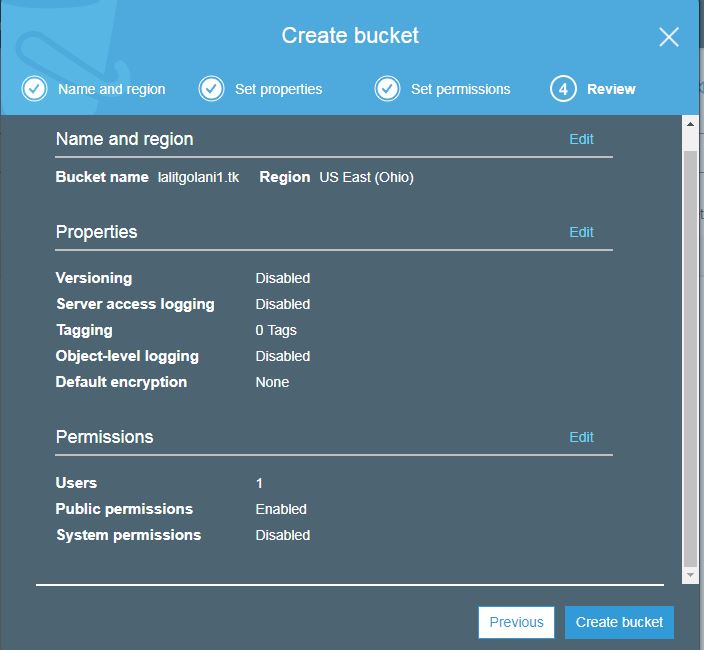
- At the next screen type the name of the bucket same as your custom domain name (in this example : lalitgolani.tk)
- Click Next and keep the settings intact in "Properties" section, click next
- In the Permissions tab on the create bucket window, select "Grant Public Read Access to this bucket"
- Click Next to reach to review window and click "Create Bucket".


- Once the your S3 bucket is created. Now its time to enable "Static Website Hosting" property on it.
- Go to the S3 area of your AWS subscription and select the S3 bucket you just created (lalitgolani.tk)
- Then go to its properties and select "Static Website Hosting" property
- Select the first radio button "Use this bucket to host a website" and in the next text box put the name of the default page of your static website you want to display on your website as homepage. (e.g. index.html)
- Click "Save" and get out of the properties of your S3 Bucket.


Register your Custom Domain Name (host name) with Route53.
- Route53 is an excellent DNS service provided by AWS to route your request to other DNS name and register DNS names of your choice.
- Go to Services and then Select "Network & Content Delivery" section and select Route53
- On Route53 page , select "Hosted Zones" under "DNS Management" category


- Now enter the name of your custom domain registered with domain registrar in the "Create Hosted Zone" . This should be exactly same as your website name that you want to publish.
- Select "Public Hosted Zone" in Type property.
- Lastly click on "Create" button

- As soon as you click on Create you will see a "Hosted Zone" with name (lalitgolani.tk in our case) has been created.

- Select that hosted zone that you just created, you will notice that 2 Record Sets have already been created (One NS record and one SOA)
- Copy the NS (Name Server) record set details in the Notepad as these will be used to update the Name Server records for your website name on the domain registrar's website where you have registered your custom domain from.

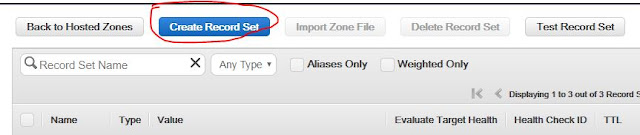
- Now create a new Record Set (Similar to Host A Record) on the Route53 console which will point to your S3 bucket (which we had created in previous step)

- On the Create Record Set window keep the Name field untouched as we have already mentioned our domain name (lalitgolani.tk)
- Make sure the Type field is selected as A-IPv4 Address
- Click on Alias and select Yes
- In the next field "Select the S3 Bucket" you had created in previous step.
- This will make the Hosted Zone as an Alias of S3 bucket (Host A record in DNS language)
- Click on Create.
- You will see a new Record Set create pointing to S3 Bucket.


Now 70% of your task has been done.
Updating Name Server Details for your Domain name on Domain Registrars website.
This is an important step when you are hosting your website on S3 bucket with a custom domain name of your choice. (like lalitgolani.tk)
- Go to your Domain Registrars Website where you bought your custom domain from (for example Godaddy.com)
- Login to your account.
- Go to the properties of your domain (in our case lalitgolani.tk)
- Select Name Server details and update these name server details as per record sets we had copied in Notepad.
- Note that changing the Name Server details on your custom domain name registrar's website may take 24 hours to 48 hours to reflect for all. This depends on the frequency of publishing Name Server details set by your Domain Registrar.

Upload the Website files (html files) on your S3 Bucket to be published
Now as the last step you will upload your web files (html) that you want to publish using S3 bucket and Route53 hosting facility of AWS.
- Go to your S3 bucket you had created in previous step and select that (here lalitgolani.tk)
- Click on Upload button then select add files
- Navigate to the location on your local computer where your html files have been kept , select them and click Open.
- Now click next and in the "Set Permission" section select "Grant Public Read Access to this object(s) under Manage Public Permissions. (Setting public Read access permission is necessary to enable these files to be accessible to public on your website hosted on S3 Bucket")
- and then click on upload.
- These files will be uploaded to the S3 bucket root


- Once you upload your html files to your S3 buckets they are visible under your bucket as following :

And thats it, you have completed all the steps to host your custom domain website on AWS S3 bucket through Route53 feature.
Now its time to test.
Go to your web browser and type the name of your website you have configured on AWS S3 bucket in previous steps (here lalitgolani.tk)
And here you go................

Enjoy!!! Feel free to comment on this blog post.

özel ambulans
ReplyDeleteen son çıkan perde modelleri
uc satın al
minecraft premium
en son çıkan perde modelleri
lisans satın al
yurtdışı kargo
nft nasıl alınır