Problem Statement:
Creating a Custom VPC in an AWS region with a Public Subnet and to Spin up EC2 instances which are accessible from internet.Solution:
In this exercise, I will show you how can we create a Custom VPC in our AWS account with a Public Subnet which will host EC2 instances which can be accessed from internet.
Steps:
1. Log on to AWS Console with your root account and select VPC.2. Click on Create VPC and enter the details of your new VPC like Name and CIDR Block.
3. Make sure your CIDR block has a unique private IP range. I am selecting 10.0.0.0/16.
4. Click on Create and done.

5. Now create and attach an Internet Gateway to this VPC since this VPC will require internet gateway to connect with internet.
6. Click on Internet Gateway from the left pane of VPC page and Create Internet Gateway. Give a name to the new Internet Gateway and click create.

7. Attach this Internet Gateway to your new VPC.
8. Go to Internet Gateway page again, select the newly created IGW and select "Attache To VPC". In the next window select the new VPC to be attached and click attach. Your VPC is now attached with the Internet Gateway. Please note that one VPC can have only one Internet Gateway attached to it.
Once the IGW is attached to VPC it should look like following:

9. Now create a Public subnet under this VPC in Ohio which will host our EC2 instance.
10. For creating a Public Subnet in new VPC, Select Subnets from left Pane and click on Create Subnet Button. Enter following details in the next window to create Public Subnet:
Name Tag: Name of the Subnet
VPC: Name of VPC where you want to create this subnet (in our case our new VPC). Select it from Drop Down.
Availability Zone: Select Availability Zone of your choice from the Drop Down
IPv4 CIDR Block: Give the CIDR block of IPs which will be used by this Subnet
(I have chosen 10.0.1.0/24). Make sure that Subnets IP CIDR block must be smaller than VPC's CIDR block.
11. Now click on Create Button.

12. The public subnet in your custom VPC has been created but it is not yet able to assign public IPs to its EC2 instances nor it is able to communicate to internet. For this we will have enable it to auto assign Public IP address to its EC2 instance and also need to associate it with a Route Table which allows it connect to Internet.

13. Now select that Public Subnet and Click On Action and select "Modify Auto-Assign IP Settings".. In the next window Check the box saying : Auto Assign IPv4 and click Save.

14. Now EC2 instance created in this Subnet with automatically a public IP assigned to them. Without having EC2's public IP, we cant connect from our desktop via internet.
15. Now create a Route Table which will allow traffic to/from this subnet to internet via Internet Gateway and associate that Route Table with our newly created public Subnet. Remember that one subnet can have only one Route Table associated with it at a time.
Create Route Table - Go to VPC section again, Select Route Tables from left pane and Click on "Create Route Table" button.
16. Give a Name to the Route Table and Select VPC from the drop down menu. We will select our VPC which we had created recently.

17. This route table will have default route to its VPC but will not have route to the internet. '
18. To add a route to the internet to this route table Select the newly created Route Table and click on Routes button underneath. Click on Edit Routes.

19. In the Edit Routes window , 2 routes will already be their by default, dont change them, but add to more routes 0.0.0.0/0 and ::/0 in Destination and Select the Internet Gateway (which is associated with this VPC) from drop down menu as Target for both the new routes and click on Save Routes button.
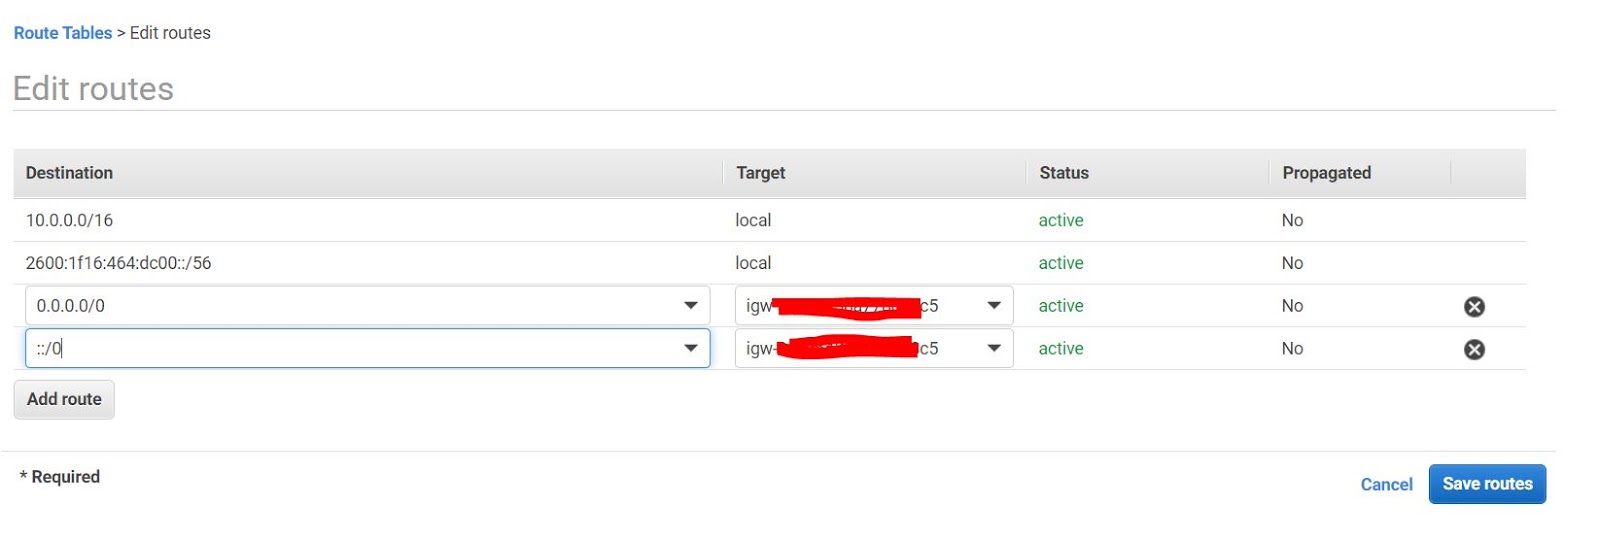
20. This Route Table is now allowing routes to / from internet via Internet Gateway.
21. Now associate this Route Table with our Public Subnet. Click on "Subnet Associations" button on Route Tables page and then click on "Edit Subnet Associations"

22. In the next Window, Select the Subnets you want to associate with this new Route Table. In our case , We will only select the Subnet which we recently created (Public Subnet). and then click Save.

23. This is all you need to do to create a Custom VPC with a Public Subnet. Any EC2 instance which will be spun up in this Public Subnet under this Custom VPC will be accessible from internet (Provided you have associated a right security group (SSH 22 from 0.0.0.0 for Linux and RDP 3389 from 0.0.0.0 for Windows machines) and have the right key.
24. I have create an EC2 instance in this VPC and it is accessible from internet.

25. This instance is accessible from Internet. This has been spun up in my Custom VPC with a Public Subnet in Ohio Region.

This is how we can create our own Custom VPCs and Public Subnets in our personal AWS accounts.
Cheers!!!!
