Pages

Monday, June 11, 2018

Installing and Configuring Apache HTTP server on an EC2 Linux instance in AWS

Hello Friends,

In this post, I will elaborate:

How to Install & Configure Apache HTTP server on an EC2 Linux instance in AWS


Prerequisite:


1. An AWS Subsription
2. An EC2 Linux instance (I have taken RHEL for my comfort)
3. A client machine
4. An SFTP client to upload custom HTML files

Steps : 


Creating Security Groups for EC2 instance to allow HTTP & SSH (SFTP) traffic.


  • I am assuming that you have already created a EC2  Linux instance in your AWS subscription and it is in running status. I have chosen RHEL Linux as I am more comfortable with this flavor.
  • Go to your EC2 Dashboard and Select "Security Groups" under "Network & Security" Section.
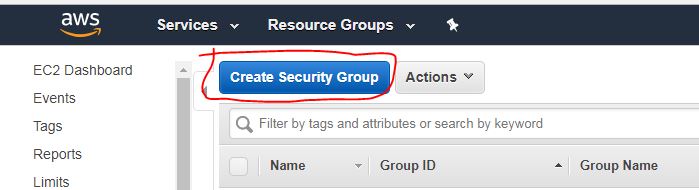
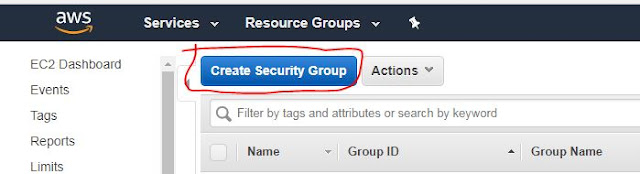
  • Click on "Create Security Group" 

  • On the Next Screen , give security group a name, description and set "Inbound" rule to allow HTTP traffic from Anywhere and  OutBound rule for all ports, then click "Create"
  • This will allow HTTP traffic from public to EC2 instances associated with this security group.
  • You don't need to create a Security Group for SSH(SFTP) because at the time of creation of EC2 instance , you must have selected the default Security Group which allows SSH from all sources.
  • Now associate our EC2 instance with this new security group.
  • Go to EC2 Dashboard and select your EC2 instance, Click on Actions , select Networking and then select "Change Security Groups"

  • On the next screen Select the Security Group (HTTP & HTTPs) which you had created in last step (keep rest of the settings unchanged) and then click on "Assign Security Group"
  • Now your EC2 instance has been assigned with the necessary Security Groups required for allowing HTTP & SSH connection. 
  • Now we will connect to to our Linux instance.


Connecting an EC2 instance through Putty.

  • At the time of creation of your EC2 Linux instance, you must have created and downloaded the Key-Pair(.pem file).
  • This Key-Pair will be used to connect to that EC2 instance through Putty.
  • But before we could use that key-pair to connect the EC2 instance , we will have to convert it in the format which is understandable by Putty. 
  • Putty does not understand .pem format so we will convert it to .ppk (Putty Private Key) file using Puttygen tool
  • Puttygen.exe can be downloaded from This Link.
  • Now open the Puttygen.exe file on your local machine and click on File and then select "Load Private Key".

  • Browse to the location where you have saved the key-pair (.pem file) and click Open


  • It will load the Thumbprint of Private Key in PuttyGen Console.Now click on Save Private Key button.

  • Save the Private Key in PPK format now.

  • Since we now have converted the key-pair in Putty usable PPK format, we will use it in Putty as authentication to connect our Linux EC2 instance.
  • Now open Putty and in Session window enter following address in Host Name (Or IP Address field) 
       ec2-user@ec2-18-205-163-151.compute-1.amazonaws.com

  • Here ec2-user is the default user name for the Linux EC2 instance (for RHEL instances) and ec2-18-205-163-151.compute-1.amazonaws.com is the public DNS name of your EC2 instance. This can be found on the EC2 instance properties. 
  • Now on your Putty window , Click on the "+" sign before SSH and then click "Auth" for setting up Putty to use Private Key as authentication , click on browse and navigate to the location where you had saved the .PPK file created in PuttyGen.

  • Now Select the PPK (Private Key) file and click Open. It will load the key-pair file in to Putty.

  • Now click Open 

  • You will now see the Putty session has been established with your EC2 Linux instance with the default user (ec2-user). 
  • It will also show the IP of the host from where you have connected this EC2 instance from. (I have hidden my public IP for security purpose)


Installing Apache HTTP server on your EC2 Linux Instance 

  • Once you get the Putty session of your EC2 Linux instance, rest of the things are very straight forward.
  • Get in to Sudo (root) access by typing following command
           sudo su

  • Because these EC2 instance have internet access by default , we will directly install the Apache HTTP server from Yum repository 
  • Shoot following command on your Putty session:
         yum -y install httpd 
  • httpd is the package name of Apache HTTP server. The above command will install Apache on your EC2 instance.
  • Now permanently enable httpd service through following command 
         systemctl enable httpd


  • Once httpd service is enabled you need to start the httpd service through following command:
      systemctl start httpd

  • You have now taken all the steps to Install , Configure and enable Apache HTTP server on your EC2 Linux install. Now its time to connect

Testing:

  • To test that Apache HTTP server has been successfully installed on your EC2 Linux machine and is able to process HTTP request, try to browse the Public DNS name of your EC2 instance from your local machines browser.
  • If your browser shows the Apache Test pages (as following) then you have successfully configured the Apache HTTP server on your EC2 instance.


Happy Blogging !!!!!


Sunday, June 10, 2018

Installing and Configuring Apache HTTP server on Linux (RHEL)

Hello There,

In today's post I will show:


How to install and configure Apache HTTP server on Linux server


Prerequisite:

1. A linux server an version (I have taken RHEL for my confort)
2. Root (Sudo) access on the Linux machine to install Apache
3. Internet connection on Linux box to connect and download repositories (Apache)
4. A client machine to test the website and connectivity to Apache Web server.

Steps:


  • Log on to your Linux machine and get sudo access


  • Now install Apache HTTP server Linux using Yum command
  • Execute following command on your Linux terminal 
        yum -y install httpd
  • This command will search for binaries on the online yum repositories and will install the dependencies before installing Apahce HTTP service (httpd)


  • Once all dependencies and packages required for installing apache http server are installed, the screen will look like following : 

  • Once Apache HTTP server is installed on your Linux machine you need to enable the httpd service because by default all external services are disabled in Linux. Execute following command to enable httpd service
      systemctl enable httpd


  • Now start the httpd service by following command: 
     systemctl start httpd


  • Now you need to add a firewall rule in your Linux IPTables to allow HTTP traffic on Port 80. Otherwise clients will not be able to access the websites running on your Apache webserver.
  • Shoot following command to enable HTTP access on port 80 on your Linux machine.
       firewall-cmd --zone=public --add-port=80/tcp --permanent

  • Once you successfully add the firewall rule on your Linux machine, you will need to reload your firewall services to make this change in to effect:
  • Shoot following command to reload your your firewall service on Linux instance:
      firewall-cmd --reload

  • Now check if your Firewall has really allowed port 80 and if the Rule has been added to IPTables or not This command is just to double check that your firewall is allowing port 80 (http), if port 80 is allowed then you should get result as shown in following screenshot:
       iptables-save | grep 80


  • And that's it, You have taken all the necessary steps to Install & Configure Apache HTTP server on a Linux box.

Testing :

  • To test that Apache is now configured on Linux box and can serve the HTTP requests successfully, try to access your Linux server's IP from browser of client machine (In my case it is a windows XP Virtual Machine) like http://192.168.75.136
  • You should get the Apache Test page on client machine's browser.


Voila!!!!! Apache HTTP server is not successfully set up on your Linux machine

Happy Blogging !!!!


Wednesday, June 6, 2018

Publishing Static Website on AWS using S3 bucket with a custom domain name

Hi Friends,

I am starting a new series on my blog related to AWS.

As the first post under AWS series , I will show : 


How to publish a Static Website on AWS using S3 Bucket with custom domain name


Solution :


Prerequisites: We will need following prerequisites to host our static website on AWS using S3 Bucket with a custom domain name

1. A domain name (e.g. lalitgolani.tk) registered with a domain name registrar (like godaddy.com).
2. An AWS subscription (I am using the free tier subscription for this demo)
3. Static HTML files that you will upload to your website hosted on S3 bucket in AWS


Steps: 


Create a S3 bucket :

Create a S3 bucket with the same name as your domain name is: (in this example : lalitgolani.tk)

  • Log on to your AWS subscription 
  • Go to Services and select S3 under Storage section
  • click on Create Bucket button
  • At the next screen type the name of the bucket same as your custom domain name (in this example : lalitgolani.tk)
  • Click Next and keep the settings intact in "Properties" section, click next
  • In the Permissions tab on the create bucket window, select "Grant Public Read Access to this bucket"
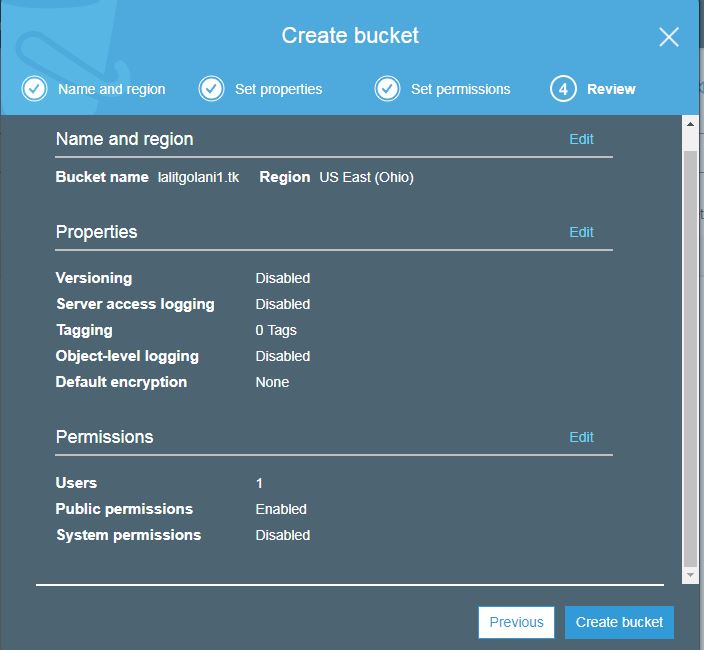
  • Click Next to reach to review window and click "Create Bucket".


  • Once the your S3 bucket is created. Now its time to enable "Static Website Hosting" property on it.
  • Go to the S3 area of your AWS subscription and select the S3 bucket you just created (lalitgolani.tk)
  • Then go to its properties and select "Static Website Hosting" property
  • Select the first radio button "Use this bucket to host a website" and in the next text box put the name of the default page of your static website you want to display on your website as homepage. (e.g. index.html)
  • Click "Save" and get out of the properties of your S3 Bucket.


Register your Custom Domain Name (host name) with Route53.


  • Route53 is an excellent DNS service provided by AWS to route your request to other DNS name and register DNS names of your choice.
  • Go to Services and then Select "Network & Content Delivery" section and select Route53 
  • On Route53 page , select "Hosted Zones" under "DNS Management" category


  • Now enter the name of your custom domain registered with domain registrar in the "Create Hosted Zone" . This should be exactly same as your website name that you want to publish.
  • Select "Public Hosted Zone" in Type property.
  • Lastly click on "Create" button

  • As soon as you click on Create you will see a "Hosted Zone" with name (lalitgolani.tk in our case) has been created.

  • Select that hosted zone that you just created, you will notice that 2 Record Sets have already been created (One NS record and one SOA)
  • Copy the NS (Name Server) record set details in the Notepad as these will be used to update the Name Server records for your website name on the domain registrar's website where you have registered your custom domain from.

  • Now create a new Record Set (Similar to Host A Record) on the Route53 console which will point to your S3 bucket (which we had created in previous step)


  • On the Create Record Set window keep the Name field untouched as we have already mentioned our domain name (lalitgolani.tk)
  • Make sure the Type field is selected as A-IPv4 Address
  • Click on Alias and select Yes
  • In the next field "Select the S3 Bucket" you had created in previous step. 
  • This will make the Hosted Zone as an Alias of S3 bucket (Host A record in DNS language)
  • Click on Create.
  • You will see a new Record Set create pointing to S3 Bucket. 


Now 70% of your task has been done.

Updating Name Server Details for your Domain name on Domain Registrars website. 


This is an important step when you are hosting your website on S3 bucket with a custom domain name of your choice. (like lalitgolani.tk)

  • Go to your Domain Registrars Website where you bought your custom domain from (for example Godaddy.com)
  • Login to your account.
  • Go to the properties of your domain (in our case lalitgolani.tk)
  • Select Name Server details and update these name server details as per record sets we had copied in Notepad.
  • Note that changing the Name Server details on your custom domain name registrar's website may take 24 hours to 48 hours to reflect for all. This depends on the frequency of publishing Name Server details set by your Domain Registrar. 


Upload the Website files (html files) on your S3 Bucket to be published


Now as the last step you will upload your web files (html) that you want to publish using S3 bucket and Route53 hosting facility of AWS.

  • Go to your S3 bucket you had created in previous step and select that (here lalitgolani.tk)
  • Click on Upload button then select add files
  • Navigate to the location on your local computer where your html files have been kept , select them and click Open.
  • Now click next and in the "Set Permission" section select "Grant Public Read Access to this object(s) under Manage Public Permissions.  (Setting public Read access permission is necessary to enable these files to be accessible to public on your website hosted on S3 Bucket")
  •  and then click on upload.
  • These files will be uploaded to the S3 bucket root 


  • Once you upload your html files to your S3 buckets they are visible under your bucket as following : 


And thats it, you have completed all the steps to host your custom domain website on AWS S3 bucket through Route53 feature.

Now its time to test.


Go to your web browser and type the name of your website you have configured on AWS S3 bucket in previous steps (here lalitgolani.tk)

And here you go................


Enjoy!!! Feel free to comment on this blog post.


Thursday, December 7, 2017

How To Remediate Server_Info and Server_Status Information Disclosure vulnerabilities from Apache http server

If you are an administrator or webmaster of an internet facing website, it becomes mandatory for you to keep your website safe and secure from seen \ unforeseen threats.

Many a time your organization's security team or the PCI compliance team scans your webserver to check the robustness and security of your server. 
In my today's post , we will discuss : 

How to Remediate Server_Info and Server_Status vulnerabilities on Apache HTTP Server.


When you get the vulnerability scan report  for your Apache HTTP server , the above mentioned vulnerabilities may be listed like following : 
  •  Apache mod_info /server-info Information Disclosure Vulnerability - Apache mod_info is a module package in Apache which provides a comprehensive overview of the server configuration.
  • Apache /server-info Information Disclosure - An information disclosure vulnerability in the Apache Web server allows attackers to view system configuration data.
  • Apache /server-status Information Disclosure - An information disclosure vulnerability in the Apache Web server allows attackers to view sensitive configuration data on the targeted host.

If they find any vulnerability on your webserver they come up with the vulnerability \ threat report and you are asked to remediate \ mitigate these vulnerabilities as soon as possible.

/Server_Info & /Server_Status are two important tags in Apache HTTP server which are used by the Webmasters, or Web Server Administrators to check the status and details of the server, But both of these pages can be exploited by attackers out there with malign intentions. So it becomes imperative for the administrator to either disable these 2 pages or restrict there access.


In an ideal situation , Server_Info and Server_Status pages should only be accessible locally from the web server but not from the out side of the server.


Solution: 

To restrict the access of /server_info & /Server_Status pages only to locally :
  1. Log on to the server where Apache is installed.
  2. Go to Apache installation directory
  3. Navigate to Conf folder 
  4. Take a backup of httpd.conf file
  5. Now Edit the http.conf file and update following 2 sections as given below:
      

<Location /server-status>
      SetHandler server-status
      Order deny,allow
      Deny from all
      Allow from 127.0.0.1
  </Location>

  <Location /server-info>

      SetHandler server-info
      Order deny,allow
      Deny from all
      Allow from 127.0.0.1
  </Location>

Save the httpd.conf file and restart the Apache services on your server.

These settings will enable Apache Http Server to display the /server_info   & /Server_status pages only when they are accessed locally (means from the same server where Apache is installed). All other requests coming from other sources to access these 2 settings will get "Access denied" error.

That's it!!!!


Note : If you have installed Apache as a subproduct of XAMPP then you will have to update the httpd_info.conf file instead of httpd.conf

The next time you get your Apache server scanned for vulnerabilities, you will not find the vulnerabilities listed above.
        

Wednesday, November 29, 2017

Manage your Own Pageviews doesn't work in Blogger with Custom Domains

If you are in to Blogging and writing blogs using Blogger or Blogspot, on any topic of your choice. I am sure that you will be concerned about your page views and its reach to your audience. In this tryst you keep watching the stats of your blog posts to see who is watching your blog posts and from where.

Tracking of pageviews of your blogposts give you an absolute idea that how can you make your blog more interactive and increase its reach to more audience.

Tracking of your blogpost views is quite simple in Blogger. 

You just need to log on to Blogger --> select the blog (From drop down menu at the Top Left corner) --> click to Stats

It will give you the detailed view of all pageviews (location and date wise) in tabular as well as graphical format.

But these stats also include your own pageviews that you might have clicked to see the look and feel of your blog posts. 

Being an honest blogger you will never want to show your own pageviews in overall statistics of your blog posts. Specially when you show your overall pageviews on your blog.

How to stop tracking your own page views in Blogger : 


Scenario 1: 


If you are using simple blog name like https://<yourblogname>.blogspot.com then it is quite easy to stop tracking your own page views.

Just follow these steps : 


  1. Log on to Blogger
  2. Select your blog from the drop down menu in the top left corner of the screen
  3. Click on Stats
  4. In the upcoming page , click on "Manage tracing your own page views" (See Pic 1)
  5. In the next page check the Check Box " Don't Track my pageviews for this blog (Pic 2).
Pic 1 : Manage Tracking your page views


Pic.2 : Manage Tracking your page views


And that's it. It will tell the Blogger to not to track the page views from your this browser.


Scenario 2 : 


When you are using a custom domain name (www.yourwebsite.com) where your blog is getting redirected to and you have not configured https (SSL) on that domain name like in my case (www.lalitgolani.com). 

When you click on ""Manage tracing your own page views" you run in to following error : 

"This site can't be reached. www.sitename.com unexpectedly closed the connection.

Error on Manage Tracking page

Reason : 

You face this issue because you are (1) Using the custom domain name for your website and (2). You have not enabled HTTPS on your custom domain name. Blogger enables SSL by default on your normal blog name which ends with "Blogspot.com" but if you are using custom domain name for your blog then you will need to buy an SSL certificate and configure it with your website name. And this incurs cost.

Solution : 

To solve this problem and enable yourself to "Manage Tracking your Own Pageviews" with the custom domain name of your Blog , just remove "HTTPS" from the address bar and hit enter.

This will lead you to the same page where you can manage your page view tracking settings.


Note: If you are using more than one browser on your machine and want to stop Blogger to track all your own page views, you will need to follow the above steps from all your browsers.


This solution worked for me like a charm. Hope it will work for you guys too !!!!!!!


Monday, November 27, 2017

Generating Self Signed SSL Certificate using OpenSSL on Windows machine


In my last post , we had learned How To Generate CSR using OpenSSL

Now when we have created CSR , we will use this CSR (Certificate Signing Request) to create a Self Signed Certificate.

So Lets get Ready for 

Generating Self Signed SSL Certificate using OpenSSL on Windows

For generating a Self Signed Certificate using OpenSSL on a windows machine we need following 3 things : 


  • OpenSSL installed on the machine.
  • A root CA (Certification Authority
  • A Private Key
  • A CSR file

We have already created a CSR in my last post but here we will create another CSR after we create the CA and Intermediate CA in OpenSSL

Creating Root CA in OpenSSL

For creating a Root CA in OpenSSL follow these steps from your OpenSSL console in Command Prompt.

1. Generate Root CA key through this command 

           genrsa -out lalitca.key 4096

         This command will generate a 4096 bit strong RSA key for our Root CA 
         and will store it in key file with name lalitca.key.


Note : If you want to password protect this key , simply add the -des3 option in the above command. For the sake of simplicity I have just skipped this option.

2. Now based on this CA Key we will create our Root CA certificate. We will have to give our Root CA an identity like Country, State, Location, Organization, OU, CommonName etc. Put in all this information carefully.

           req -new -x509 -days 3652 -key Lalitca.key -out Lalitca.crt


Note :  We using -x509 switch to create self-signed certificate and -days 3652 switch insures that this RootCA certificate will be valid for 10 years.


Now we have the Root CA in place. We are all set to create a CSR which will be used to create a self Signed certificate signed by this Root CA.

Creating a CSR 

Execute following 2 commands in same order to generate Private Key and CSR file.

                               genrsa -out test.key 4096

                         req -new -key test.key -out test.csr

Put in all required information again (Country, State, Location, Organization, Organization Unit, Common Name) Etc.

Note : Make sure you give a different Common Name (in this step) than Root CA. Otherwise you will run in to an error at later stage.


Now we have all 3 things in place (OpenSSL, RootCA and CSR). Its now time to generate our first Self-Signed certificate from OpenSSL.

Execute following command to create the certificate based on CSR and get it signed by RootCA we created in above steps.


x509 -req -days 1095 -in test.csr -CA lalitCA.crt -CAkey lalitca.key -set_serial 01 -out lalit.crt

This command will give you results like following : 

Signature ok
subject=C = US, ST = Arizona, L = Tempe, O = Lalit, CN = web.lalitgolani.com
Getting CA Private Key


And that's it.

You have successfully created your RootCA and first Self-Signed certificate using OpenSSL on a windows Machine.


In my next post , I will show how to convert the .CRT file in to .P12 (PFX) file and install it on IIS.