Problem: When we create ALB (Application Load Balancer) under AWS ELB, we sometimes have to configure SSL on that load balancer to allow only HTTPs requests through it.
Assumption:
I am assuming that audience of this blog post already know how to Spin up EC2 instances and how to create ELB - ALB in AWS.Pre-Requisites:
1. Two identical EC2 instances with Apache, OpenSSL and AWS CLI installed on them.2. An IAM user having Power User access to the AWS subscription which will be used to upload certificates to IAM store.
3. An ALB (Application Load Balancer) in AWS with above 2 EC2 instances added in target group of this ALB and with only HTTP listener port. We will add HTTPS listener in later steps.
Solution:
To solve the above problem we will take following steps.1. Create 2 identical EC2 instances in 2 different Availability Zones with in the same region and allow them to be placed in public subnet of that VPC.
2. Log on to these instances using putty. In case of Windows instances connect them using RDP.
3. Since I am using Linux instances.. I will do putty to them. I have used Amazon Linux AMI to create instances since this AMI comes with AWS CLI & OpenSSL pre installed.
4. Get sudo access to the EC2 instance and then Install latest updates on these EC2 instances using following command.
- Sudo Su
- yum update -y
- shutdown -r
5. Once the server resumes from restart, install Apache http server using following command:
- yum install httpd -y
This command will install Apache HTTP server on EC2 instance.
6. Now confirm if the Apache Service is active on the server or not, using following command.
- systemctl httpd status
7. Now create an index.html file under /var/www/html directory in order to differentiate both the EC2 instances from each other. Run following command to create and update the index.html file
- cat > /var/www/html/index.html
Put some code in the file like "I am Webserver1"
Press Ctrl+C to save and close the file.
8. Run ls command to confirm that index.html file is present under /var/www/html folder.
9. Repeat steps 4 through 8 on second EC2 instance. Make sure you change the html code in index.html file on other EC2 instance like " I am Webserver2".
10. Now since we have created 2 apache web servers on EC2 instances. Let us now create Self Signed Certificate which will be used on ALB later on.
11. To create Self Signed Certificate on your EC2 instance, you must have OpenSSL installed on it. the Amazon Linux AMI has OpenSSL preinstalled but if you are using any other Image or template then you can install it using following command.
- yum install openssl -y
12. Once OpenSSL gets installed on the EC2, it automatically sets the environment variable so you can directly run the OpenSSL command.
13. To install the Self Signed SSL certificate you must have 2 files in PEM format (privatekey.pem and certificate.pem). We will create both of these files now using OpenSSL
14. On you EC2 instance one. run following commands to create the Private key and then the Certificate using that private key.
- openssl genrsa 2048 > my-private-key.pem
It will give you following output
15. Now create the certificate.pem file (Actual certificate) through following OpenSSL command.
- openssl req -new -x509 -nodes -sha256 -days 365 -key my-private-key.pem -outform PEM -out my-certificate.pem
Enter the details like Country name, Location, State, etc.
Make sure that you put the common name as : *.amazonaws.com because we will be using the SSL on ALB endpoint which ends with amazonaws.com
you will get following output.
16. Since we have now successfully creates the SSL private key and SSL certificate on one server.. It is time to upload this certificate to your IAM store from where the ELB fetch it for allowing HTTPs traffic.
17. For uploading these 2 certificate files from your EC2 instance to your AWS IAM certificate store we will use AWS CLI. I am assuming that you have AWS CLI pre installed on your EC2 instance.
18. Run following command to configure your AWS CLI to connect to your AWS subscription.
- AWS Configure
- Enter the Access Key ID of the user you have created in IAM
- Enter the AWS Secret Access Key for the same user.
- Enter the default region name as "Region name where your ELB is running"
- just press enter once and your AWS CLI is now configured on your EC2.
18. Upload both SSL files to your IAM store using following command
- aws iam upload-server-certificate --server-certificate-name MyCertificate --certificate-body file://my-certificate.pem --private-key file://my-private-key.pem
You will see following output in JSON format confirming that your SSL certificate files have been successfully uploaded to IAM store.
19. We are now good to configure our ALB (Application Load Balancer) to allow HTTPS traffic and use our Self Signed Certificate which we have recently uploaded too IAM.
20. Go to EC2 dashboard and click on Load Balancer from Left hand menu.
21. Select "Create Load Balancer"
22. Select "Application Load Balancer (ALB).
23. In the next window Give name to your Application Load Balancer and Select HTTP & HTTPS as listeners (This is very crucial). If you will select only HTTP , it wouldn't use the SSL certificate you uploaded. You will have to choose HTTPS also as the listener .
24. In Next Section, Select atleast 2 Availability Zones . Make sure you select those Availability Zones where are your EC2 instances are hosted.
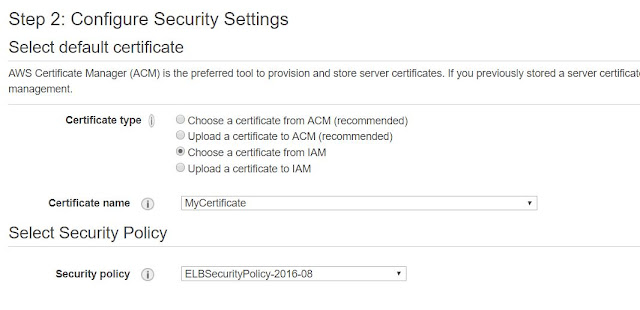
25. In the Security Settings Page Select "Chose A Certificate From IAM" option and then Select "MyCertificate" from drop down. In the Security Policy section select the latest one to be compliant with latest security policies.
26. For Security Group Settings, Select the Security Group which allows HTTP & HTTPs traffic to this ELB from internet because this ELB is public facint. I have selected the same which my EC2 instances are using.
27. In the Next page "Configure Routing" , create a new Target Group and and add both of your EC2 instances as Targets. Here Target means the EC2 instances where the ELB will forward the request. Keep all the settings as default and click "Register Target" in the next window.
28. Click Review and then Launc.
29. It might take 2 to 3 minutes to create the ALB for the first time. Once your ELB is successfully created it will show you as "Active" when you will click on it.
30. It will show you a DNS name which is the end point of this ALB. We will use this endpoing in our browser to access the ALB.
31. Browse this DNS name (ELB End Point) in your browser. Based on the load balancing algorithm it will pass your request to one of the EC2 instances hosted behind this ELB.
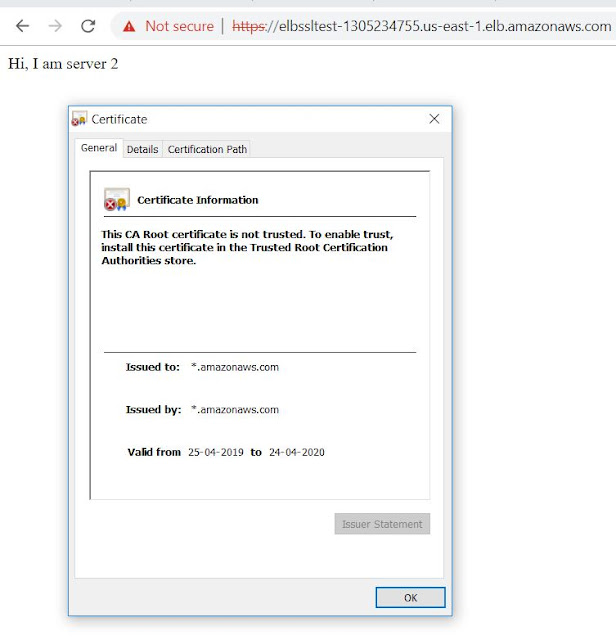
32. Let us try to access this ELB url with https:// , if our configurations are correct, it will show an error saying that "your SSL certificate is not trusted". This is the expected behavior because our SSL certificate is a self-signed certificate. It has not been issued by any Trusted Root CA.
34. This is how we can create the ALB (Application Load Balancer) in AWS which will allow HTTPS traffic using SSL certificate.
Enjoy!!!!


As I website owner I think the articles here is rattling superb , thanks for your efforts. webflow developers
ReplyDeleteWow this hit it to the spot we will bookmark on Bebo and also Hub pages thanks love it And also my prayers to the people at atomic plant we hope you are OK along with safer too !!! Kudos Financial Advisers user interface design
ReplyDeleteThank you a lot for making this website . I m into gambling niche and have found this website using search on google . Will be sure to share . I am affiliate and have found your site very informational Many thanks , see ya. :S front end website developer
ReplyDeleteThe transducers are used in many different industries to monitor tension and compression. Bridges for example, must be monitored for static and dynamic weight testing and railway tracks must be measured for stress. load cell
ReplyDeleteFree online games… [...]With havin so much content do you ever run into any problems of plagorism or copyright infringement? My website has a lot of completely unique content I’ve either authored myself or outsourced but it looks like a lot of it is popping it up all ov… web design company
ReplyDeleteDead composed subject matter, thanks for information . website design agency
ReplyDelete
ReplyDeleteNice Post!!
Thanks for Sharing and Commenting
Are You Looking for Buy Real Tiktok followers,Likes and Facebook Post Likes,Comments,Profile Follow and Etc..
Download 10 Free Latest Bollywood Movies HD for Android Phone
Top 10 Best Free Bhojpuri Full Movie Download Sites in HD,MP4 2020
Top 10 Star and Beautiful Bollywood Actress Name list with Photo 2020
7 Best Ways to Make Money on YouTube in 2020
Buy Real TikTok Followers
How Many likes Does it Take to Monetize Your Facebook Page
Wow i can say that this is another great article as expected of this blog.Bookmarked this site.. applicant tracking system
ReplyDeleteThanks for another excellent post. Where else could anybody get that type of info in such an ideal way of writing? In my opinion, my seeking has ended now. CE certificate
ReplyDeleteThis article is an appealing wealth of useful informative that is interesting and well-written. I commend your hard work on this and thank you for this information. I know it very well that if anyone visits your blog, then he/she will surely revisit it again. CE certificate
ReplyDeletecheap SSL is a protocol that creates a secure bridge between the browser and the server and provides a secure environment for data transit. Today SSL becomes a necessity for E-business and other online merchants. Street shopping has been replaced with online shopping.
ReplyDeleteYou made such an interesting piece to read, giving every subject enlightenment for us to gain knowledge. Thanks for sharing the such information with us to read this... certificate holder
ReplyDeleteReally clear step-by-step! Especially helpful how you covered IAM upload via CLI—often skipped but crucial for ALB SSL setup labubukeychain.shop.
ReplyDeleteDepression treatment in Nashville, TN, helps individuals overcome emotional struggles through therapy and medical support. Patients receive personalized care tailored to their needs. The goal is to restore balance, confidence, and overall well-being. depression treatment nashville tn
ReplyDeleteAnxiety treatment centers Los Angeles help individuals manage panic disorders, social anxiety, and chronic stress through structured therapeutic approaches. anxiety treatment centers los angeles
ReplyDelete