Pages

Thursday, November 23, 2017

Install OpenSSL on Windows

Being a webserver administrator , you are many a times required to request SSL certificates, install them on websites, or need to convert them to other formats like .Crt, .Pfx, .p12 etc....

Though there are many tools available in the market \ internet which can convert your SSL certificate to other formats bus the best and handy tool , i suppose, is OpenSSL.

OpenSSL can be installed on your local machine (Windows or Unix) and you can play around with it , tweek things, and learn how does it operate.

In this blog post I will share : 

How to Install OpenSSL on Windows

Step 1:  Download the Windows version of OpenSSl from here. You wouldn't 
             find the binaries on Openssl.org site. I would suggest to download the 
             full version (around 30 MB) as it will give you more options to play 
             around. ( Latest OpenSSL version for Windows 32 
             bit is Win32 OpenSSL v1.1.0g

Step 2:  Save the exe file at any location of your system and double click it.

Note :  You may run in to following error if Microsoft Visual C++ Redistributable Package is not installed on your machine. It is prerequisite to have it installed before you go for OpenSSL installation. You can download it from Microsoft's Download store.


Step 3: Click next and keep the default path of installation as C:\OpenSSL-  Win32.


Step 4: Leave the default settings as it is for next screen and click Next 


Step 5:  Once all parameters are set, click Install


If all is fine on your machine it will install OpenSSl on your machine in less than 2 minutes. For my machine it took exactly 1 minute 32 seconds.

Once the OpenSSL is installed , just click finish. 

If you you want to donate few bucks to OpenSSL select any of the check box.


Step 6 :   I want to create the certificates in folder C:\OpenSSLCertificates. So 
               create a folder called OpenSSLCertificates in C drive of your machine.


Step 7 : Now start a command prompt as administrator and go to 
            C:\OpenSSLCertificates.

Step 8 : Once OpenSSL has been successfully installed on your 
            Windows machine and you have created a folder to store certificates , 
            you will obviously want to run it. But before running it you should set 
            following 2 Environment Variables. 

            Put the following 2 commands in your command window

               set RANDFILE=c:\OpenSSLCertificates\.rnd

               set OPENSSL_CONF=C:\OpenSSL-Win32\bin\openssl.cfg


Step 9 : Now you are all set to run OpenSSL.  To run it go to path C:\OpenSSL-
            Win32\bin and Right Click OpenSSL.exe and select Run As 
            Administrator


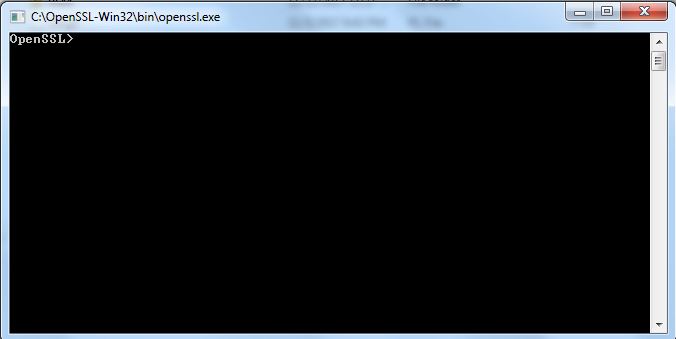
Step 10 :  If you have followed all above steps properly , you should see 
               following screen 


Your comments are welcome about this post!!!!!

Thursday, November 16, 2017

How to know the ..NET Framework version installed on your machine

Issue :  

Its a common practice among Webserver Administrators to find out the exact version of .net framework installed on their IIS box. It can be found in the properties of Application Pool in IIS manager. But you can find only the main version of .Net Framework there like 1.1, 2.0, 3.0, 3.5, 4.0 etc.


If you need to know the exact version of .NET Framework like (4.5, 4.6, 4.61, 4.7 etc) the above mentioned way can not help. 


Solution : The best and most authentic way to know the exact version of .NET Framework installed on your machine is : 

1. Log on to server with Admin rights.
2. Go to Run
3. Type : Regedit
4. It will open registry editor.
5. Go to following path under HKEY_Local_Machine : 

HKEY_LOCAL_MACHINE\SOFTWARE\Microsoft\NET FRAMEWORK Setup\NDP\V4\Full

6. Click on "Full" key and at the right hand pane you will find another key with name "version"
7. This key contains the exact version number of .NET Framework 4 installed on your machine.

See the following pic :  


CHEERS!!!

Monday, November 13, 2017

Sharepoint Error : Error deleting Web site . You can't delete a site that has subssites

Issue: Sometimes we face an error while deleting a Site under a site collection which has some sub sites created under it.

We get following error when we try to delete a site which has its child sub-sites already created :

Error deleting Web site . You can't delete a site that has subssites

STSADM -o deleteweb command also does not delete the site and throws the same error.

This error message itself is an incorrect statement because you can easily delete sharepoint sites that have subsites through following steps.


Solution:  Try Following steps to delete such site that are not top level site collections and have sub sites created under them:

  • Go to Site Admin Screen with Admin Privileges 
  • Select Site Actions
  • Go to Site Settings
  • From Site Administration >>> Content and Structure  (You need to have the "Office Sharepoint Server Publishing Infrastructure" site collection feature activated to see the Content and Structure link. )
  • In the left pane, move to the parent or the main site which you want to delete and select it by clicking it.
  • In the right pane, choose the site you want to delete. Click on all subsites' check boxes of that main site if you want to delete them as well.
  • Click on  Actions >>> Delete
  • You will be prompted with following message : 

                  Deleting the selected sites will permanently delete all content and 
                  user information. All subsites in this site will also be permanently 
                  lost. Do you want to continue?: 

  • Click OK

You will now be able to delete the site having subsites.


How to Connect database server running SQL Embedded Editiong SQL 2005 or SQL 2008

Connecting the Management Console of SQLExpress Edition of SQL Server through Management Studio:

When we install WSS 3.0 (Windows Sharepoint Services 3.0 on a Standalone machine, it installs the SQL Embedded Version of MS SQL Server to use as back end database server. When we try to connect this SQL server via Management Studio, 

It gives us following error.

============
ERROR MESSAGE
============
Cannot connect to SERVER\MICROSOFT##SSEE.
===================================
A network-related or instance-specific error occurred while establishing a connection to SQL Server. The server was not found or was not accessible. Verify that the instance name is correct and that SQL Server is configured to allow remote connections. (provider: SQL Network Interfaces, error: 26 - Error Locating Server/Instance Specified) (.Net SqlClient Data Provider)
------------------------------
------------------------------
Error Number: -1
Severity: 20
State: 0
------------------------------

Reason : 

Because this version of SQL server ( Embedded Edition) is installed by Sharepoint, the SQL server Management studio does not consider it as fully supported SQL server. That's why you can not connect the backend database server (SSEE) via Management Studio by simply typing the server name or its IP Address. 


Solution : 

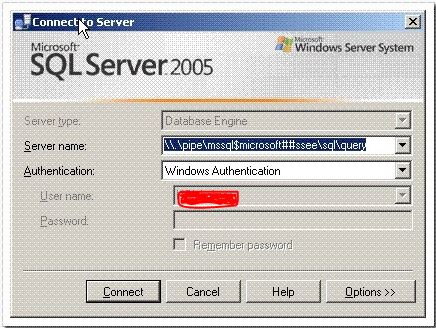
To connect the Embedded version of SQL Server (installed by Sharepoint) via Management studio, you need to use named pipes address as following : 

1. Open the Management studio (With Farm Admin or SA login) on the machine where Sharepoint has installed the express version of SQL Server.

2. Put exactly following Named Pipes Address in the Server Name box : 

    np:\\.\pipe\MSSQL$MICROSOFT##SSEE\sql\query


3. Just click Connect and you will be able to see the Databases configured by Sharepoint on its local version of Express Edition.

4. You can carry out all required operations from here provided you have Admin access on all databases.

ENJOY !!!!!


Thursday, September 15, 2016

How to Create Private Key & CSR Using IIS server

Problem :  Sometimes we get a CSR from the user to create the SSL certificate but we dont have access to IIS to install the certificate back to that IIS and we need the SSL in PFX\P12 format as well.


Resolution : 


When Ever you create a CSR (Certificate Signing Request) a Private Key is also create in the background. This Private key is used to Install the certificate back to IIS , when you receive the certificate in .CER format against that CSR file. This Primary Key resides only on the server from where the CSR file was created and is never shared by anybody. 

Suppose you dont have access to IIS to install the CER file and need a PFX certificate to install that SSL on other server as well. In that case following steps needs to taken.


Backup Your Private Key


To backup a private key on Microsoft IIS 6.0\7.5\8.5  follow these instructions:
1. From your server, go to Start > Run and enter mmc in the text box. Click on the OK button.
2. From the Microsoft Management Console (MMC) menu bar, select Console > Add/Remove Snap-in.
3. Click on the Add button. Select Certificates from the list of snap-ins and then click on the Add button.


4. Select the Computer account option. Click on the Next button.
5. Select the Local computer (the computer this console is running on) option. Click on the Finish button.
6. Click on the Close  button on the snap-in list window. Click on the OK button on the Add/Remove Snap-in window.
7. Click on Certificates from the left pane. Look for a folder called REQUEST or "Certificate Enrollment Request> Certificates


8. Select the private key that you wish to backup. Right click on the file and choose > All Tasks > Export 
9. The certificate export wizard will start, please click  Next  to continue. In the next window select Yes, export the private key and click Next 
10. Leave the default settings selected and click Next.
11. Set a password on the private key backup file and click  Next 
12.  Click on Browse and select a location where you want to save the private key Backup file to and then click Next  to continue. By default the file will be saved with a .pfx extension. 
13. Click  Finish, to complete the export process.


Convert the Private Key from PFX to RSA Private Key Format (.Key File)


The private key is backed up as a ‘.pfx’ file, which stands for Personal Information Exchange.

To convert it to RSA Private Key format supported by most of the servers\systems.
1. Download and install latest version of OpenSSL for windows from http://www.slproweb.com/products/Win32OpenSSL.html.

2. OpenSSL requires Visual C++ Redistributables which can be downloaded from 

3. First Install the Visual C++ Redistributables and then Win32OpenSSL which you downloaded from Above Link.

4. Open command prompt a, navigate to C:\OpenSSL-Win32\bin>, and run the following commands.

Set OPENSSL_CONF=c:\openssl-win32\bin\openssl.cfg 

5. First we will convert the Private key (Which we had backed up in .PFX format) to .PEM format using following command. 

openssl pkcs12 -in PrivateKeyFilename.pfx -nocerts -out key.pem

6. Now We Will convert that .PEM file to much awaited .KEY file using following command.

openssl rsa -in key.pem -out PrivateKeyFilename.key


Now you have both the fiels with you (. CER & .KEY ) which will be used to create the certificate in .PFX format which I will share in my next Blog.

Cheers!!!


Tuesday, July 5, 2016

ASP 500 Error with Code 0x800700aa While browsing a .asp page

Problem :

Some times you try to browse a simple ASP page (Legacy ASP) hosted on IIS 7.5 or IIS 8.5 and you run in to following Error : 


Detailed Error Information 
Module IsapiModule 
Notification ExecuteRequestHandler 
Handler ASPClassic 
Error Code 0x800700aa 
Requested URL http://localhost/New_Site/Default.asp 
Physical Path C:\inetpub\wwwroot\New_Site\Default.asp 
Logon Method Anonymous 
Logon User Anonymous


You try all the other options like Enabling 32 Bit, Changing AppPool Pipeline mode to Classic, installing .net framework 1.1 or 2.0 but it doesn't help. 

Diagnose the Problem : 

 To find the main reason of this problem you will need to run Process Monitor and filter the logs to see only ProcMon Logs related to w3Wp.exe. 

While digging the logs, you may find some logs similar to following : 

12:31:49.0797868 PM    w3wp.exe    8264    CreateFile    C:\Program Files\McAfee\VirusScan\scriptsn.dll    PATH NOT FOUND 
 
                                                                        OR

12:31:49.0797868 PM    w3wp.exe    8264    CreateFile    C:\Program Files\McAfee\VirusScan\scriptsn.dll    PATH NOT FOUND  

Now the question is, why an asp file request is calling a .dll file which is related to to McAfee AntiVirus program.

Some times , when McAfee is installed on your server or Updated , it add this DLL as part of there ScriptScan feature  to intercept the script calls before they are executed on following Regresty Key : 

HKEY_LOCAL_MACHINE\SOFTWARE\Classes\CLSID\{B54F3741-5B07-11cf-A4B0-00AA004A55E8}\InprocServer32 
    (Default)    REG_SZ    C:\Program Files\McAfee\VirusScan\scriptsn.dll

In normal Conditions, this Registry Key (CLSID - HKEY_LOCAL_MACHINE\SOFTWARE\Classes\CLSID\{B54F3741-5B07-11cf-A4B0-00AA004A55E8}\InprocServer32 ) points to VBScript.dll but here it is pointing to C:\Program Files\McAfee\VirusScan\scriptsn.dll. And this is the reason, ASP files are not being processed when requested.


Resolution : 

To Resolve this issue you need to perform following tasks : 

  •  Open Registry Editor 
  • Navigate to :   HKEY_LOCAL_MACHINE\SOFTWARE\Classes\CLSID\{B54F3741-5B07-11cf-A4B0-00AA004A55E8} 
  • Right Click and Select Permissions 
  • Click Advanced 
  • Click on the owner Tab 
  •  In the “Change owner to ”  Administrators 
  • Click Apply can click OK 
  • The Select Administrators in the list of accounts under ” Groups or User names” 
  • Click the “FULL Control” 
  • Click Apply and OK 
  • Now Double click on InprocServer32 and Modify its value as "C:Windows\system32\vbscript.dll".
  • Click OK and come out or Registry settings.
  • Recycle the application Pool serving your application or Reset IIS if necessary.

VOILAAAAAAA !!!!! It Works !!!!!!

Cheers!!!


Wednesday, May 4, 2016

Installing and Configuring .Net Framework 1.1 on Windows Server 2008 R2

Problem : 


Some times we need to install .Net Framework 1.1 on Windows Server 2008 R2 to run legacy applications on IIS 7.5 ( Such as ASP application). Microsoft does not provide .net framework v1.1 by default on Windows server 2008 R2. You need to install and configure it Manually.


Solution : 


Here are the steps to Successfully Install and Configure .Net Framework v1.1 on Windows Server 2008 R2.

Step 1: Install "IIS METABASE COMPATIBILITY" From Server Manager 
Click Start, and click Server Manager. Expand the treeview in Server Manager and click Manage Roles, and then Web Server (IIS). In the right-hand pane look for an option that says Add Role Services. This takes you to wizard where you can install "IIS Metabase Compatibility".

Step 2: Install .Net 1.1
You will get a Compatibility warning You can Easily Ignore that Warning and RUN the setup.

Step 3: Enable ASP.Net v1.1 ISAPI Extension
Now go to IIS Manager under Administrator Tools, and in the features view click on ISAPI and CGI Restrictions feature. In the actions pane click add.
Extension: C:\Windows\Microsoft.NET\Framework\v1.1.4322\aspnet_isapi.dll
note: change drive if your system drive is not C:\
Description: ASP.NET v1.1
Alternatively the Same can be achieved by running following command 
running%windir%\Microsoft.NET\Framework\v1.1.4322\aspnet_regiis-enable
Step 4: Edit machine.config
.Net v1.1 will throw runtime exceptions if you have IIS configurations in the web.config files that are read by your .net v1.1 applications. To make it ignore IIS configuration sections  edit the machine.config in %windir%\Microsoft.NET\Framework\v1.1.4322\config\machine.config by adding the following section just above the bottom tag for the <configSections> element:
<section name="system.webServer" type="System.Configuration.IgnoreSectionHandler,
    System, Version=1.0.5000.0, Culture=neutral, PublicKeyToken=b77a5c561934e089" />
</configSections>


Step 5: Configure the site to use v1.1 Application Pool

In IIS Manager, select the site that you want to run on .Net Framework 1.1,  Advanced Settings. Adjust the application pool to use ASP.NET 1.1 which will use .Net Framework 1.1.
NOTE :  You can also create your own Application pool with the name of your choice. Steps to create application pool in IIS 7.5 is given in my previous blog.

Step 6 (Very Important) : Now you Need Fix 64bit bug otherwise you will not be able to open the settings of your websites configured to use .net framework V1.1 in IIS 7.5. It will throw an exception.
The config for .net v1.1 does not exist for 64bit  operating systems so you need to copy it from the 32bit folder by doing the following.
  • Create \Windows\Microsoft.net\Framework64\v1.1.4322\config
  • Copy machine.config from \Windows\Microsoft.net\Framework\v1.1.4322\Config\


Now you are all set to use .net framework v1.1 in IIS 7.5

Cheers !!!!

Courtesy : https://community.rackspace.com/products/f/25/t/820